Showing posts with label STREAM. Show all posts

Wednesday, March 29, 2023

Take & Make Craft Kit: Paper Gnome House

  I introduced this to-go craft kit as a way to use up some paper soup cups I had in storage.    


Supplies provided in the kit:
Square of patterned paper
Glue dots (5)
Paper cup
Colored pens (3)


What you need from home:
Scissors
Optional: Glitter glue, buttons, sequins, craft foam, etc. for decorating


Instructions: 
Every gnome house is unique!

Use scissors to cut off, or round off, all four corners of your paper square. Make it into a circle-like shape. Your circle, or squircle, does not need to be perfectly symmetrical. In fact, a non-perfect squircle will give your gnome house a special charm!


2.     Fold the squircle in half one way. Unfold. Fold the squircle in half another way. Unfold. Where the two folds meet is the approximate center of the squircle. Look at your paper squircle shape. Choose which pattern, or side, you want to show, and which will be hidden underneath (the backside). Use a pen to make a dot in the center of the squircle on the backside of the paper.


3.      On the backside of the squircle shape, draw two straight lines from the center dot to the edge. This should look somewhat triangular, like the shape of a piece of pie. Use scissors to cut out the pie wedge using the lines for guidance.


4.      Holding onto the squircle shape, overlap the two corners made by the pie wedge cut out. Overlap these two corners as little or as much as you want until you make the cone shape you desire. This cone will become the roof of your gnome house. When the cone shape is how you like it, use two glue dots to hold the paper cone in place.


5.      Place the paper cup in front of you, bottom side up. Place three glue dots around the bottom edge of the paper cup. Gently press the cone over these glue dots. Double check to make sure the paper cone is touching all three glue dots.


6.      Use the color pens to draw a door on the outside of the paper cup. Also, use the pens to decorate the outside of your gnome house. You can add windows, plants, animals, mushrooms, or whatever you think is needed. Be very careful when handling the gnome house as you decorate it. The color pen ink smudges easily!


Thursday, May 26, 2022

Take & Make Craft Kit: Sun Stitching

  I introduced this to-go craft kit as we welcomed the sun shining in spring!  But really, it could be used to celebrate the sun any time of year!  

Supplies provided in the kit:
Plastic large-eye sewing needle
Yarn
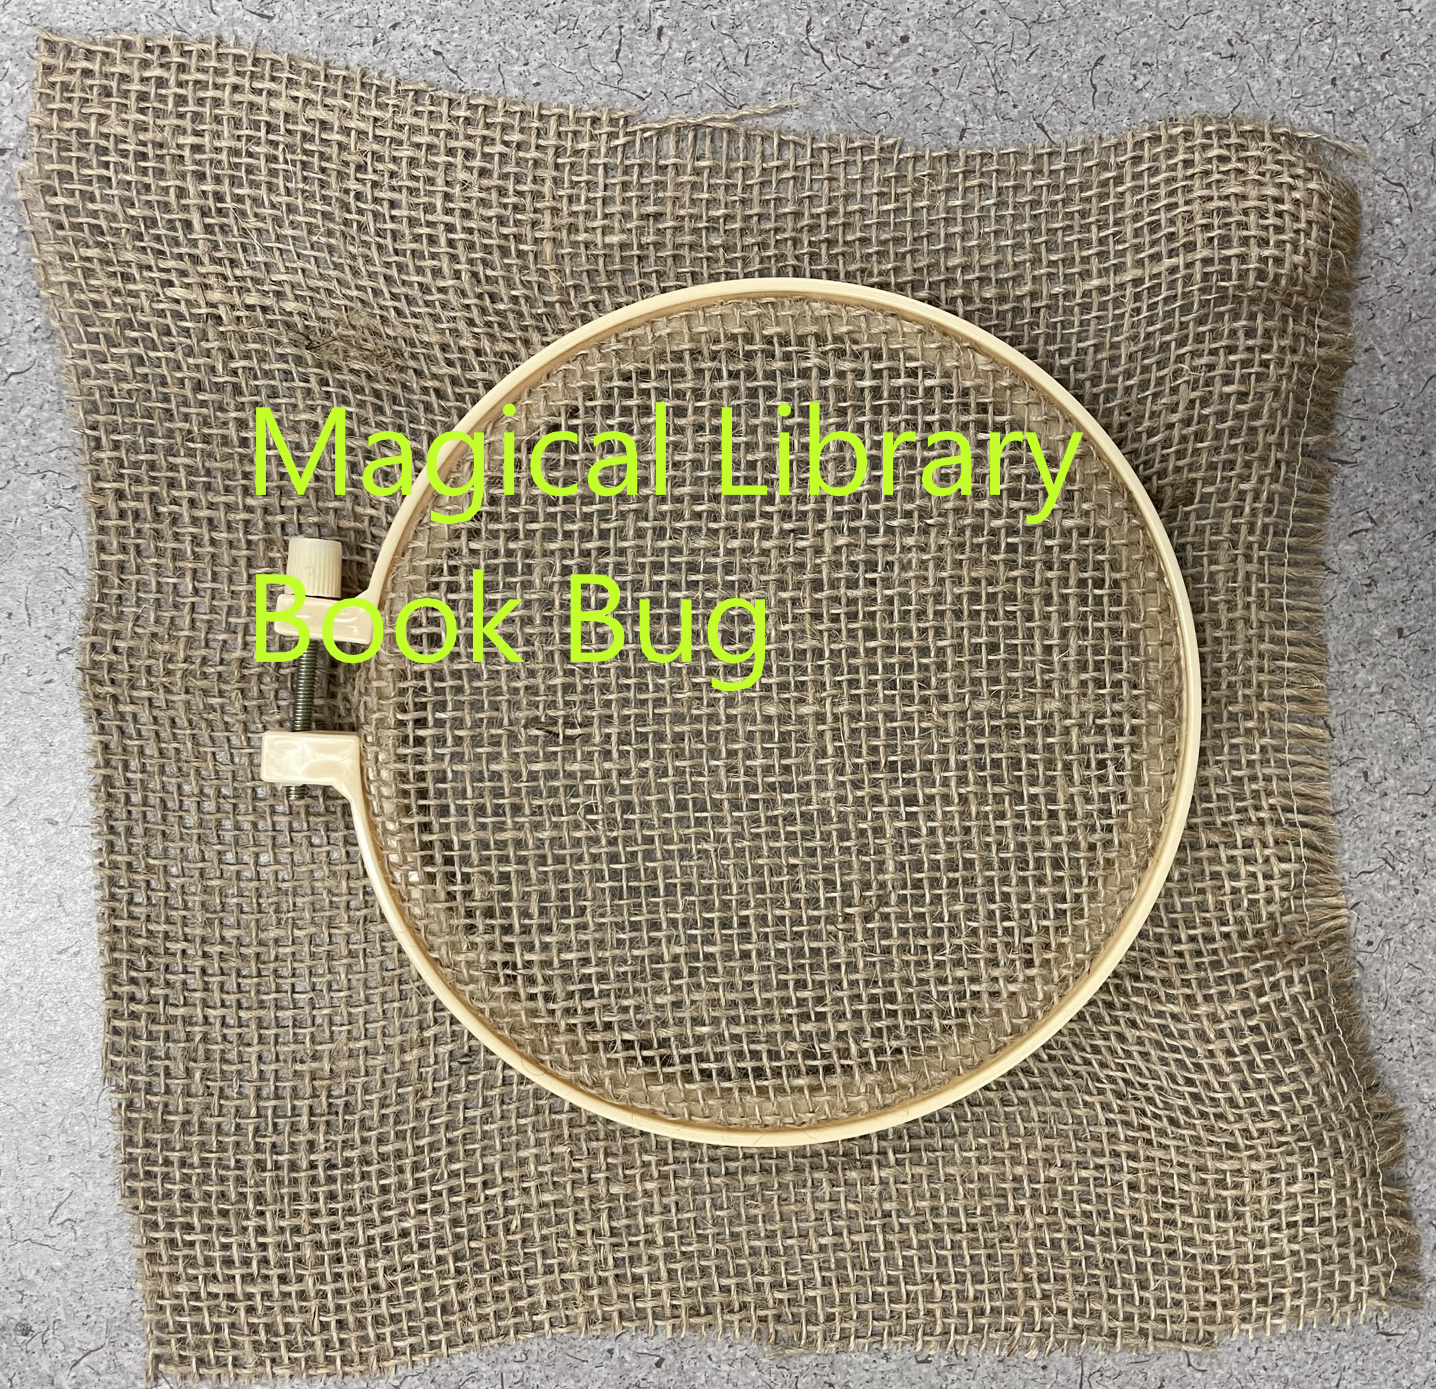
Burlap fabric
Embroidery hoop
Cardboard circle
Pencil


What you need from home:
Scissors
Optional: Pens, buttons, sequins, craft foam, etc. for decorating


Instructions: 

1. Clamp the burlap fabric inside the embroidery hoop

2. Thread the needle
Cut the yarn into 2 foot long lengths. Push one end of the yarn through the eye of the needle. Leave about 2-3 inches on one side of the needle.  Tie a knot at the end of the long side of yarn.  Large knots are best. 

3. Trace the circle of your sun
Using the cardboard circle and the pencil, lightly trace the circle in the center of the burlap inside the embroidery hoop. 

4. Stitch the circle of your sun
Start from the back side of the hoop, poke the needle through the burlap somewhere along your pencil line circle.  Carefully pull the needle and yarn through.  Stop when the knot gets to the burlap.  Do not pull the knot through the fabric.  Now, a little way away from where your yarn came through the fabric, but still on the pencil line circle, push and pull the needle and yarn back through the fabric from the front side.  You made your first stitch!

A little way away from this spot, but still on the pencil line circle, poke and pull the needle and yarn through again from back to front.  Poke and pull the needle again, a little way away, from front to back. Continue this back and forth stitching from back to front, front to back, all the way around the pencil line circle.  

When your stitches go all the way around the circle, make sure your last stitch ends with the needle and yarn on the backside.  Unthread your needle.  Tie a knot as close to the burlap fabric as you can make it.  Cut off the extra yarn.  

5. Stitch the rays of the sun
Think about where you want your sun rays to come off the circle.  If needed, use the pencil to lightly draw the straight lines of the rays onto the fabric.  

Thread your needle.  Knot the long end of the yarn.  Choose the spot for your first straight line ray.  From the back side of the fabric, poke and pull the needle and yarn through the fabric at one end of the ray line.  Do not pull the knot through the fabric.  Poke and pull the needle and yarn from front to back on the other end of the ray line.  Unthread the needle.  Tie a knot as close to the burlap fabric as you can make it.  Use your scissors to cut off the extra yarn after the knot.  

Repeat as many times as necessary until you have your desired number of sun rays stitched.  

6. Hang up your sun
Use scissors to trim the extra burlap around the embroidery hoop.  

Using your leftover yarn, tie it to the embroidery hoop screw.  Tie it into a yarn loop at your desired length.  Use this loop to hang up your stitchery.  

7. Optional - Decorate your stitching
While your stitchery will look wonderful without any decorations, feel free to use craft foam, buttons, pens, glitter glue, or whatever else you can find to decorate your sun.  

Every sun stitching is unique!


Friday, May 6, 2022

Take & Make Craft Kit: DIY Troll Hair Headbands

 Another successful craft kit that my library gave away.  

Supplies provided in the kit:

Headband
Tulle cloth
Paper ruler
Rubber band
Yarn for tying


What you will need from home:

Scissors
Optional: Ribbon, colored paper, felt, craft foam, etc. for decorating 


Instructions: 

1. Cut your tulle cloth

a) Cut strips of tulle cloth.  Length should be approximately 20 to 24inches long.  Width should be approximately 2-6 inches wide.  Measurements do not need to be exact!

b) For each headband, you will need about 10-30 strips of tulle, depending on how wide you make them and how thick you want your troll hair.  


2. Attach your tulle to the headband.


a) Fold each strip in half to make a loop.

b) Place the loop part way under the headband.

c) Reach through the loop to pull the ends of the strip through the loop.


d) Tighten gently.

e) Repeat for all the strips or until the headband is full of loop knots.  


3. Trim and decorate

a) Once all the strips are on the headband, personalize your troll hair.  Spread the strips apart or push them together for different looks.  One popular style is to loosely gather the ends together and tie with the provided yarn (this helps the hair stand up, too).  

b) Optional: Add decorations like stars or flowers made of paper, felt, or craft foam. 

There is no wrong way to create your troll hair!


Monday, March 14, 2022

Take & Make Craft Kit: Spin Drum

 I introduced this to-go craft kit as a New Year celebration art activity.  But really, it could be used to celebrate anything!  


Supplies provided in the kit:

  • 2 soup lids
  • 1 sponge brush
  • 2 styrofoam squares (these were needed to make the soup lids stick to the sponge brush handle)
  • 1 piece of yarn 
  • 6 beads
  • 1 roll of washi tape
  • 1 glue stick


Supplies needed from home:
  • Scissors

Directions:

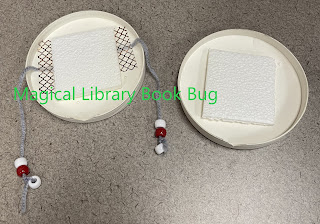
  1. Grab the piece of yarn and beads.  Take one bead and tie it to one end of the yarn.  Thread the next 5 beads onto the yarn, tying the last one to the other end of the yarn.  Slide the beads on the yarn so that 2 beads sit on either side of the yarn.


  1. Grab one of your soup lids and drape the yarn over the inside of the lid, making sure there are 3 beads on either side of the lid. Tape the yarn to the inside of the lid with one piece of tape on each side of the lid.


  1. Grab one of your Styrofoam squares and glue it down to the inside of the lid on top of the yarn.


  1. Grab the remaining soup lid and Styrofoam square.  Glue the Styrofoam square to the inside of the lid.


  1. Cut a small notch on one side of each soup lid; you want the dowel of the sponge brush to fit inside the notch.  The notches should be cut below the yarn.  Stack the lids on top of each other to make sure the notches line up with each other.  You can use the dowel of the sponge brush itself as a measuring guide. The dowel should line up perpendicular to the yarn.  

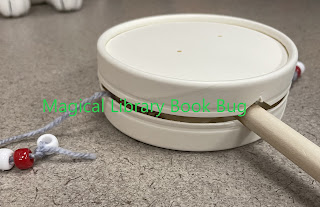
  1. Once you’ve determined the sponge brush will fit into the notches on the lids, apply glue around the edges of the notch and on the Styrofoam square in the center of the lid. Place the sponge brush inside the notch on the lid, making sure the dowel sticks to the notch and the sponge on the brush is sticking to the Styrofoam square in the center of the lid.


  1. Take the other soup lid and apply glue to the notch and the Styrofoam square, then stick it on top of the lid with the sponge brush, making sure that the notch fits over the dowel and the sponge part of the brush is securely inside the two lids.


  1. Set your drum aside and place books, rocks, or other heavy items on top of it as the glue dries.  The weight will allow two lids to stick together more firmly so that the sponge brush will be held more securely.


  1. Once the glue has dried, use washi tape around the edge of the soup lids to keep the two lids held together. (You might need to use two layers of washi tape.)  Once this step is complete, you will have a spin drum!  Have fun!


Monday, April 20, 2020

Robots Everywhere Toddler Storytime


Storytime for 1 to 3 year olds:
·         Opening - Skinnamarink, Sticky Sticky Bubblegum


·         Book #1 – Robots, Robots Everywhere! by Sue Liess, illustrated by Bob Staake (board book) 

·         Stand-up Activity – Lights on the Robot (action song to the tune of "Wheels on the Bus" that I found on the Hushlander blog)

·         Bridge - Open, Shut Them (fingerplay)
Open, shut them
(open and close hands)
Open, shut them
Give a little clap (clap)
Open, shut them
Open, shut them
Put them in your lap
(put hands in lap)

Creep them, creep them
Under your chin
(creep fingers up chest)
Open your mouth, but don't put them in
(do as words say)

Open, shut them
Open, shut them
Give a little clap
Open shut them
Open shut them
Put them in your lap 


·         Flannelboard - Five Noisy Robots (counting down rhyme I found on the blog Anne's Library Life)

·         Letter of the Day - "R" is for Robot

·         Transition - Tommy & Tammy Thumb (fingerplay)
Tommy Thumb up,
Tommy Thumb down,
Tommy Thumb dancing all around town.

Tammy Thumb out,
Tammy Thumb in,
Tammy Thumb dancing all in a spin.

Dancing, dancing, dancing,
Dance them on your knees,
Dance them on your head,
Dance them on your shoulders,
Then tuck them into bed.

·         Book #2 –  The Robot Book by Heather Brown (board book) 

·         Closing -  Scarves to the song "Water, Wind and World" from The Second Line: Scarf Activity Songs by Johnette Downing


·         Art Experience – Glue craft foam shapes onto take out food box robots


Friday, April 10, 2020

Minecraft Build Competition: Spring Break Edition


Theme: Haunted train station

Hosted another successful Minecraft Build Competition during spring break. (To read how I run my Minecraft program, please read my past post on the topic.) This program is a lot of fun to offer. These tweens can be very creative.  

This was my lowest attended Minecraft event ever.  Not sure if this is due to the decline in Minecraft's popularity, or if it was because the school district did not send out the e-flyer until after the event. 


Friday, December 27, 2019

Minecraft Build Competition: Winter Break Edition


Theme: Ice Mansion

Hosted another successful (yet low attended) Minecraft Build Competition during the holiday break. (To read how I run my Minecraft program, please read my past post on the topic.) This program is still a lot of fun to offer. 

How the children interpreted this theme was very interesting.  I would not necessarily call the buildings they built as mansions.  But it was fun watching the children work out how to place snow and fire next to each other. Also, many of the children found creative ways to add blocks that looked like snow but wasn't ice blocks.  


Saturday, October 26, 2019

Moonshine Storytime

Storytime for 1 to 3 year olds:
  • Opening - Skinnamarink, Sticky Sticky Bubblegum


  • Stand-up Activity – Tiny Star (fingerplay/action rhyme I found in the 2019 CSLP Early Literacy Manual)

  • Bridge - Open, Shut Them (fingerplay)
Open, shut them
(open and close hands)
Open, shut them
Give a little clap (clap)
Open, shut them
Open, shut them
Put them in your lap
(put hands in lap)

Creep them, creep them
Under your chin
(creep fingers up chest)
Open your mouth, but don't put them in
(do as words say)

Open, shut them
Open, shut them
Give a little clap
Open shut them
Open shut them
Put them in your lap 


  • Flannelboard -   Phases of the Moon 
I cut some paper plates to create four phases of the moon (full, gibbous, half, crescent). I introduced these phases to the children and then read a poem about the moon I found on the Guybrarian blog. 

  • Letter of the Day - "M" is for moon

  • Transition - Tommy & Tammy Thumb (fingerplay)
Tommy Thumb up,
Tommy Thumb down,
Tommy Thumb dancing all around town.

Tammy Thumb out,
Tammy Thumb in,
Tammy Thumb dancing all in a spin.

Dancing, dancing, dancing,
Dance them on your knees,
Dance them on your head,
Dance them on your shoulders,
Then tuck them into bed.


  • Closing - Rhythm sticks using the song "Goin' On a Bear Hunt" from Kids In Action by Greg and Steve 


  • Art Experience – Use plastic receipt roll centers and paint to stamp craters on a paper plate moon